


QS-7 VACUUM SERVER
programmable electronic
vacuum SERVER
SYSTEM WITH QUICKSILVER CONTROLLER
OWNERS MANUAL
Set-up and operating instructions for
QS-7 Vacuum Server System
QuickSilver
Server Controller Software
READ THIS MANUAL FIRST!
Owner:
![]()
Date of Purchase:
![]()
Note- The serial number of your Server System can also be found on the bottom of the case.
Contact information:
PST 869
848 N Rainbow Blvd
Las Vegas NV 89107
866-345-3451
Vaculogic, a Division of Precision Seal Technologies,
manufactures the QS-7 in the USA.
DISCLAIMER:
This equipment is designed to provide a variable, programmable dynamic vacuum source. Beyond the design of the system, we have no control over the individual use and applications that the resulting vacuum might be used for. Most things, including vacuum can cause injury when used improperly or carelessly. YOU are responsible for researching any potential risks, exercising good judgment and making safe choices in any activity or in the use of any equipment you choose. Use of this system for any and all purposes is at the sole risk of the owner and/or user. Regardless of the cause, origin or nature of any claim for loss or injury or failure of any kind related to the use of this product, the obligation of Precision Seal shall be limited to the original purchase price of the system.
In using this equipment, the owner and users thereof accept this sole risk and responsibility without reservation, and agree to hold harmless the Precision Seal Technologies Co, it's affiliates, heirs, assigns and any others associated with the design, manufacture, distribution or sale of this equipment or software from any claim of loss or injury related to the use or ownership of this system.
IF YOU DO NOT FULLY ACCEPT THIS RESPONSIBILITY AND RISK, DO NOT CONTINUE. Return this system to the point of purchase unused and undamaged and your purchase price will be refunded.
Congratulations! You now own the
VACULOGIC QS-7
PROGRAMMABLE ELECTRONIC
VACUUM SERVER SYSTEM
The QS-7 is unique. A technical innovation; the first of its kind in a new generation. This system merges with your computer, controlling and delivering vacuum like it was music, in a constantly changing profile of pressures, ramp times and hold times that you create and call as you wish. The era of static pumping is gone- Dynamic Pumping is here, and things will never be the same.
WHATS IN THE BOX:
· QS-7 V-Server Unit
· 110V-AC x 12V-DC Power Adapter
· USB Cable, 6 ft
· Vacuum Tube, 10 ft
· CD, QuickSilver Controller Software
· This Manual
QS-7 VACUUM SERVER
&
QUICKSILVER
USERS GUIDE
CONTENTS:
section page
1- |
System Outline | |
2- |
Warranty Information | |
3- |
Hardware Set-up & Manual Use | |
4- |
Software Outline | |
5- |
Installing QuickSilver | |
6- |
Using QuickSilver | |
7- |
Care & General Notes |
Copyright 2009, Vaculogic Division of PST and Precision Seal Technologies.
Patent Pending. All Rights Reserved. No part of this manual or the QuickSilver Software may be reproduced in any form except as authorized by Vaculogic. Vaculogic, QS-7 and QuickSilver are trademarks of Precision Seal Technologies.
1
1- SYSTEM OUTLINE
The QS-7 is a PROGRAMMABLE VACUUM SERVER.
A Server differs from a conventional pump by the ability to create dynamic or actively changing vacuum levels following a pressure - time profile programmed by the user. Instead of one pressure, the system allows an infinite and continuously variable sequence to be produced.
The system does this as a peripheral (USB) device attached to a Windows-based PC. It utilizes both the CPU and internal electronics of the QS-7 unit, along with the resources of the PC and software platform. Programmable operation is referred to as QS mode, and works with the included software, QuickSilver Server Controller.
The QS-7 can also act as a conventional stand-alone vacuum pump, generating static vacuum (level pressure; not actively changing) adjusted by manual controls. Even this is superior to conventional pumps, as the unit does not run continuously, but only when needed. This use is referred to as Manual Mode and does not require computer support.
The QS-7 operates internally on 12V-DC, provided by a wall adapter (included) plugged into a standard 110V-AC outlet. The 12V format allows extensive power management control, and provides other benefits:
· No dangerous 110V current in the QS-7 power unit.
· The QS-7 is mobile, and can be operated with any 12V-DC power source, such as a vehicular power outlet. With the support of a laptop or portable computer, it can operate mobile in both QS and Manual modes.
SYSTEM REQUIREMENTS FOR QS MODE:
1 GHz or higher processor
Windows 98, Me, 2000 Pro, XP, or Vista
256 MB ram
10 MB of available hard drive space
CD Rom drive
2.0 USB port
2
!! HARDWARE ADVISORY- READ CAREFULLY
A- The pump in the QS-7 is a state of the art device and operates with very close tolerances. Contamination of the pump by fluids or debris can damage this device! DO NOT wet pump without a water trap in the line. CHECK your vacuum line frequently for signs of lube or other contaminants. Anything in the line will be drawn into the pump. Contamination voids your warranty!
B- This system uses a very sensitive electronic device to measure vacuum levels and regulate response. You must have a reasonable volume of closed airspace attached in circuit for the QS-7 to work properly. Erratic operation will result if the airspace is too small (i.e. no cylinder), or is open-ended.
2- LIMITED WARRANTY
The QS-7 Vacuum Server is warranted to be free from defects in material and workmanship for 1 year. This includes the case and all internal parts. Cables, tubing and couplings are warranted for 90 days. Determination of cause of failure will be made by Vaculogic division of PST, and our determination is final. Systems failing under warranty will be repaired or replaced at our option. Warranty limitations may vary depending on state laws.
The unit MUST be returned to Vaculogic in the event service of any kind is required. Shipping costs are the responsibility of the owner. NO user or third party service is permitted. If the case is opened by the user or any other agent except our service technicians, this warranty is VOID in all respects regardless of cause of failure.
This warranty will NOT cover damage or failure due to debris, water or other contamination inside the system, connection to improper voltage, abuse, or modification.
If you have need of service, contact Dave@pumptoys.com for assistance. Do not return your system until authorized.
3
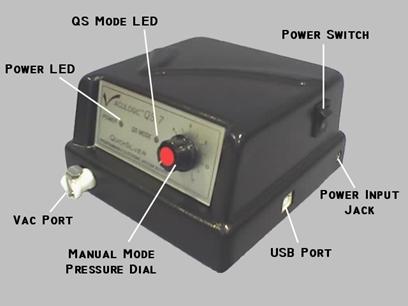
Index ▲3- HARDWARE SETUP & MANUAL USE
The following controls or connections are found on the QS-7 Server Unit:
-Power on/off Switch, on the upper right side.
-Power Input Jack, on the lower right side rear.
-USB port, on the lower right side, center.
-Vacuum Coupler, on the face, lower left.
-Manual Pressure Control, on the front panel.
-Power ON led, (red) on the front panel.
-QS Mode led, (green) on the front panel
Power to the Server is supplied by either the 110V
wall adapter or a 12V vehicle adapter cable, connected to the Power Input
Jack.
International users: If your local power service is not 110V, 60 cycle AC, see the "International Power" instructions in the General Notes area at the end of the manual.
FOR MANUAL MODE OPERATION:
(1) Turn the Manual Pressure Knob to 0.
(2) Connect the Power cable to the Power Jack.
(3) Connect the Vacuum tube to the QS-7
Coupler.
(4) Connect the other end of the vacuum tube
to your cylinder.
(5) Turn on the Power Switch.
(6) Mount the cylinder.
(7) Turn the Manual Pressure Knob to any setting
above 1. NOTE: there will be a 5-second delay
in starting, while the system performs a "self-test".
(8) Always return the Manual Pressure Knob to 0
before powering off and exiting cylinder.
4
Index ▲
IN MANUAL MODE, any setting below 1 is considered
off by the system. This does not turn off power to the unit, but leaves the
pump on a standby status.
Increase or decrease pressure by rotating the Manual Pressure Knob. Turn the Knob to zero when you are ready to exit the cylinder. The calibration of this adjustment is in approximately 1 Hg increments, or 0 to 12. The Manual adjustment works only with Manual Mode (no green light) and is disabled in QS Mode.
The QuickSilver Controller Software must be installed
before
programmable operation is possible. READ the software
section before installing or operating in QS mode.
QuickSilver is the Server Controller that allows you to create and run the profiles that make dynamic pumping possible. It is user-friendly, intuitive and requires very little time to master. Its more like a control panel interface. Most of the steps require only a mouse click or filling in a few blanks.
Quicksilver communicates constantly with the CPU in the QS-7 Server Unit. It senses the vacuum status and controls pressure and time sequences to create an effect, much as music consists of notes and timing to create an effect. A creative user could actually blend the vacuum progression to match music and play both simultaneously!
The Control Screen displays a graphic format of the execution progress during a profile run, tracking both the actual pressures achieved and the profiles targeted path simultaneously. It also displays a digital pressure gauge, and an elapsed run-time clock.
QuickSilver also allows each executed run to be recorded in a history file with the time and date of each run. Every screen also has a HELP button, which brings up an HTML version of this manual and a link to the latest on-line version with supplemental support files.
5
Index ▲
QuickSilver Terminology:
Profile is a script, or mini-program outlining a series of changes the vacuum will go through. These scripts are created by the user with a built-in assembler utility. QuickSilver compiles the outline and it is saved as a .pro file type. A profile consists of a series of user-defines steps called Events.
Event is a single step or building block of a profile. An Event consists of only three factors of time or pressure. Up to 10 events may be entered in a profile.
Event Number is the numerical sequence showing the order in which an event occurs in a profile.
Pressure is the requested pressure set for an event, stated in inches and tenths of mercury (Hg).
Hold Time is the duration an Event Pressure will be maintained, stated in seconds and tenths.
Transition Time is the length of time that is to be used in ramping up or down to the next events Hold Pressure, stated in seconds and tenths.
Total Cycle Time is the length of one repetition of a profile. This is the total of all the time entries in all the events of the profile.
Number of Cycles is the number of times a Profile will be looped, or repeated. This is variable from one to 100. As the
length of individual profiles can vary widely, so can the total
time of a set execution of that profile.
Total Run Time is the length the profile will run based on its Total Cycle Time and the Number of Cycles set.
Play List is a list of profiles that will be run in sequence. This can consist of many instances of the same profile, extending run time, or various profiles, changing the pace and style of the sequence.
.run is the file format used for saving Play Lists, so that they may be recalled as a single file and played again.
6
Index ▲5- SOFTWARE INSTALLATION
NOTE: Installation may require recent Windows Updates.
Part One: Installing the program
Locate the Server Serial number and QS Authorization Key number, inside the front cover of this book. You will need these during installation.
Insert the CD in the appropriate drive. The disc will auto-start, presenting a menu allowing you to view the read-me file, browse the disc, and install the program. If the disc does not auto-start, open the drive in Explorer and double-click AutoRun.exe to view the menu, or QuickSilver.msi to open the installer.
NOTE: You may get an "Unrecognized Publisher" alert from Windows. This is a dedicated hardware controller, not a published for distribution software. Ignore the notice.
Read and accept the software license agreement, then on the next screen choose an installation location if you would like to install the program to a location different from the default. Otherwise proceed normally, clicking Close when the installer says it has finished.
The basic installation is now complete. Do not remove the QuickSilver CD from your drive yet; it will be needed to complete the next step. DO NOT start the program!
Part Two: Installing the QS-7 driver
Choose a USB port to use for your connection. The driver associates with only this port, so always plug the QS-7s USB cable back into the same port if you remove it. If the port chosen is in a hard to reach area, you may safely leave the USB cable attached to the computer, disconnecting only from the QS-7 to store the unit.
If you use a high-speed connection for Internet access such as cable or DSL, temporarily disable it by going to your Network Connections, right-clicking the connection and choosing Disable or simply unplug the phone or cable line to your modem or router.
7
Index ▲
With the power switch off, connect the USB cable and the power source to the QS-7. NOTE: Do not use any USB extension cables.
The green led will light when the USB is attached, indicating an active link to your computer; Manual adjustment is now disabled. Note that the QS-7 is not powered by the USB connection, and must have its own power connected and the switch on to operate.
Turn the QS-7 power switch on to initiate computer recognition and begin the Found New Hardware Wizard. If the Wizard asks to connect to Windows Update, choose No, not this time.
Choose Install from a list or specific location and click Next. Check the option marked Include this location in the search and use the Browse button to navigate the Wizard to the location of the Driver folder on the QuickSilver installation CD; click Next.
If you receive a Windows logo testing warning, click Continue Anyway to allow the driver installation to be completed.
Once the installation is completed, click Finish to close.
You can verify the driver installation by going to Start > Control Panel > System > Hardware > Device Manager and find the Vaculogic QS-7 listing that appears in Universal Serial Bus controllers. If the listing is shown with no warnings, the QS-7 driver has been successfully installed and the unit will now be automatically recognized each time it is connected. You may now remove the QuickSilver CD and re-enable your Internet connection.
Congratulations! Your QS-7 is ready to use the QuickSilver control interface program.
Open the QuickSilver program using the desktop icon or by navigating your programs list. This will open the registration window. Enter your QS-7 serial number and QuickSilver software key, then press Register. If registration is successful, the program opens to the Select Device screen. This is where you will begin each time you use QuickSilver in the future. Place a checkmark in the box beside the USB <-> Serial listing in the devices list.
NOTE: Always have the QS-7 connected and on before opening the program to ensure it's contact with QuickSilver..
8
Index ▲6- USING QUICKSILVER
QuickSilver is a Controller, not a productivity software. It's a programming interface and an operations control panel.
QuickSilver's job is to convert simple outlines (your profiles) into complex mathematical algorithms that constantly read and adjust system pressures, anticipate responses and modify the command string that instructs the QS-7 V-Server. The Server then manipulates its management controls to reproduce the outline as a pressure-time curve in real time. This is done automatically, and requires little input from the user other than the profile. QuickSilvers learning curve is very short, and all features will be available immediately.
Using QuickSilver requires only two learned processes; how to Assemble a Profile and how to Assemble a Playlist.
HOW TO ASSEMBLE AND RUN PROFILES
Re-start the program now and we will develop a profile and run it.
Click on the Assemble Profile tab. This is where you build or modify profiles. The screen shows a table that will become the outline for your profile. The headings are:
· Event Number (The Event sequence in the profile)
· Pressure (Pressure the event will start at)
· Hold Time (How long the event pressure will be held level)
- Transition Time (Time used to ramp up/down to the next Event Pressure)
Click on the ADD EVENT button at the lower left. A window opens, showing Event number 1, plus three spaces for the time/pressure factors above.
- In the PRESSURE field, enter 3.0
- In the HOLD TIME field, enter 1.0
- In the TRANSITION TIME field, enter 1.0
Click OK. The first event is created and added to the table.
9
Index ▲
Click on the ADD EVENT button again. The window re-opens, showing Event number 2. Enter:
- PRESSURE 6.0
- HOLD TIME 1.0
- TRANSITION TIME 1.0
Click OK, and the second event is created and added to the table. With only TWO events entered, you now have a functional profile.
The simple profile you have just created will pulse between 3 and 6 of vacuum. It will hold pressure steady for one second at each point, then will begin a transition or ramp to the next pressure, and will take one second to make the transition. Beneath the table, you see Total Cycle Time, 4 seconds. That is the length of time the two Events take for one repetition; the sum of the four 1-second time intervals you entered.
Locate the Number of Cycles scroll bar at the bottom of the table and slide the button all the way to the right. The Total Run Time is now showing 6:40 minutes, or 400 seconds- 100 repetitions of the profile. This will be saved as the default running time.
In the window below the Run Times, you can enter a more detailed description of the program if you wish.
Click on the SAVE PROFILE button at lower right. The familiar Windows save screen opens to the Profile folder. Name the profile as pulse36 and click Save.
You now have your first profile available- Lets RUN it!
TO RUN A PROFILE:
- Click on the Assemble Play List tab.
- Click on the Add Profile button at the bottom.
- Select pulse36 from the list, and click on Open.
Pulse36 is now on your Play List.
Click on the Execute Run tab. The Run Screen appears.
10
Index ▲
Look over the screen for these features:
- Above the graph: Current Profile: pulse36.pro
- Upper right: The pressure as called for by the profile will be a RED line and the pressure reading from the QS 7 will be a BLUE line graphically constructed during the run.
- Left: The Vertical scale is vacuum in inches Hg. The Horizontal scale is time.
- Lower left: (1) Real-time
digital pressure display
(2) Elapsed run time clock
- Lower right: Start Run, Pause Run, Stop Run buttons.
- Top corners of window: Help and Exit Program buttons.
To begin the run, all you will need to do is click on the Start Run button. BUT FIRST- Attach your cylinder! REMEMBER- The system expects a CLOSED volume of air to work on. If the cylinder is not sealed in place, function will be erratic. Get the cylinder IN PLACE, and click Start Run.
The digital gauge and elapsing time clock are now active. In the graph area, the progress of the run is being illustrated in real time;
Dynamic pumping is in progress!
Enjoy what you have made happen with so little effort- but imagine what you might do with a little creativity!
You may stop the run at anytime by clicking the Stop Run button, or the run will stop on its own at the end of its set Total Run Time of 6 minutes 40 seconds.
NOTE: If you disconnect the USB cable during use, you may directly continue operation in manual mode. To return to operation in QS Mode, you must exit and re-open the program to restore the USB connection.
11
Index ▲
EXTENDING THE PLAYLIST OR PROFILE TIME
The combination of Profile and Play List formats is a very powerful structure, allowing thousands of options. Each profile in the list is played sequentially; creating a non-stop operation that changes not only in the short term, but in complete style. This is like selecting songs from multiple CDs; the pace can be whatever you want it to be. Examples:
To extend one profile:
The Play List can contain multiple instances of the same profile. If you enter pulse36 10 times, QuickSilver will run the 6:40 minute program 10 times in a row for a total run time of one hour, 6 minutes and 40 seconds.
If you altered pulse 36 by adding the same two events 4 more times (10 events total) the profile time would be 20 seconds instead of 4. With 100 cycles the total run would become 33 minutes, 20 seconds. With that profile on the Play List for 10 repetitions, the total play time would be 333 minutes, or almost 6 hours.
To create automatic breaks, changes of pace:
The Play List can contain up to 19 profiles, in any combination. All different, alternating, or any way you wish. You might have a 30 minute level pressure profile, followed by a 5 minute pulse profile, a 2 minute rest profile, then returning to the 30 minute level profile.
Any Play List you assemble can be saved as a .run file, and then recalled as a single file. The combinations are unlimited!
TIPS ON PROFILE DESIGN
Your Imagination is the key, and QuickSilver makes it easy to express. There are many ways to get imagination into the form of a functional profile. One of the easiest is to use a sheet of graph paper as a visual aide, similar to the Execute Run screen. Think of the vertical as a pressure level, and the horizontal as the time clock. You can draw a simple series of lines between points, then translate those into the pressure and time entries of the profile.
12
Index ▲
Profile Design Example
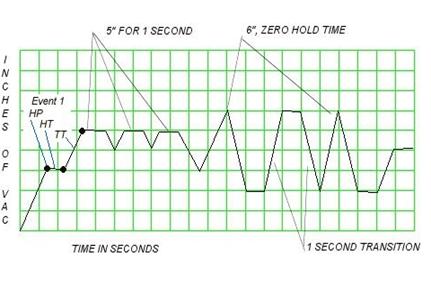
In the graph above, each square vertically represents a 1
pressure. Each square horizontally represents a 1-second time space. The graph
line starts at 0 and moves to the first dot- the Event 1 HP (hold Pressure)
point, at 3".
The line is then level for 1 space to the second dot, indicating a 1-second Event 1 HT (Hold Time).
It then slopes upward to the 5th graph line while moving 1 space to the right. This line shows a 1-second Event 1 TT or Transition Time, ramping to the second event's Hold Pressure at 5".
A point on the line indicates a pressure peak (Pressure setting) with a zero Hold Time. A level line across the top or bottom indicates a set hold time at that pressure level. The slope of a line indicates the transition time between pressures; the steeper the line, the faster the change. With a little practice, you will find more and more options. QuickSilver comes with several profiles and .run files installed, and these can be examined and modified as you like.
13
There are a multitude of options besides creating your own profiles. The QS design concept set .pro files in an open format without restrictions- A profile created in one QS system will run with any other QS system! Here's what that means to you:
- More profiles will be available to download from the web site, ready to run.
- We will allow user posting of profiles in our forum for free exchange between system owners... Shareware!
- QS profiles are very small, typically only a few KB. Users can trade these files freely, attaching them to emails.
EDITING .PRO FILES AND .RUN FILES
Anything created with the assembler tools can be edited with the same tools. To edit a .pro file, recall it on the Assemble Profile page.
To add events in sequence, click Add Event, and construct the addition just as if the profile was new. SAVE it, and the file is modified with the new events added to the bottom of the list.
To insert events into the middle of an existing profile, click Insert Event. CHANGE the event number to the position you want the new insertion to take. Construct your event and click OK. The event that was in that position is moved down list (i.e. #3 becomes #4) and your new event is inserted in its place.
To edit an event click Edit Event. Enter the event number you wish to change. Rebuild it and click OK. This will replace the original event in the same position.
To delete an event click Remove Event. CHANGE the event number to the one you want to delete, and click OK. The event is removed and subsequent events are moved up the list. You may delete all events at once by clicking on the Remove All button.
Remove Event and Remove All does not delete the .pro file; it only removes it from the current use.
14
Index ▲
Editing .run files is almost identical. A .run file is simply a list of one or more profiles linked in a sequence. To edit or save a .run file, use the option buttons on the Assemble Play List page:
To add profiles in sequence, click Add Profile.
To remove an individual profile from anywhere in the list simply highlight the profile you want to remove and click Remove Profile. * see note 1 below.
To move a profile in the list and change its order, highlight the desired profile and click Profile Up or Profile Down.
To remove all profiles and start a new list click Remove All.
To open an existing .run file click Recall Play List.
Again, using Remove Profile or Remove All does not delete the original file from your system, only from the current list.
Be sure to SAVE an edited Play List as a .run if you want it retained in the new configuration.
VIEW RUN HISTORY TAB
This feature keeps a record for you of the date, name, and elapsed time of past runs. You can delete specific entries by double-clicking them to select, then pressing delete. You can clear the entire history by clicking Delete All.
Notes-
1. One exception to correct use of the Remove Profile button was discovered after the software was compiled which should be noted, as it can result in your receiving Runtime Error messages. When your Play List includes two or more profiles, the Remove Profile button works as it should, however if you only have 1 profile entered on your Play List, to remove it correctly be sure to use the Remove All instead of Remove Profile. When only one profile exists in the list, Remove Profile removes the profile but does not properly release the line space, which will cause a Runtime error 75; Path/File not found, and forces a shutdown of QuickSilver.
15
7- GENERAL NOTES:
International User Power Note:
If you do not have 110V AC utility power, you will need to acquire a wall adapter locally that is compatible with your power type and has an output of 12V DC current.
The adapter will need to have a 1 amp (1000Ma) or greater current capacity, and will need a male plug for the Server end that is 5.5mm OD with a 2.5mm ID.
Hardware Safety & Maintenance Notes:
- Operate the QS-7 on a firm or cushioned level surface, such as a mouse pad. Do not restrict airflow around the unit.
- Use of any USB extensions may cause program failures.
- Remove the USB cable and unplug the wall adapter when the system is not in use.
- Regularly check the vacuum line for any signs of debris or fluids moving into the tube. This can contaminate the pump, causing reduced efficiency or serious damage. Contamination in the pump VOIDS the warranty.
· The server has a small foam debris filter pad installed in the vacuum port manifold, directly behind the vacuum coupler. This filter pad may be removed, cleaned and replaced easily. To do so, remove the coupling from the port. Using tweezers or a small wire with a hook (bent paper clip will work) pull the pad forward. Wash out, dry and replace by pushing it to the rear of the port recess with a pencil or other small shaft. This filter DOES NOT offset the need for a water trap or other means of keeping debris out of the server.
!! Personal Safety Note:
While the QS-7 will operate from vehicle power, DO NOT operate the system while driving. This practice could be EXTREMELY dangerous!
16
Doc #QSM Revision 1.51 02-09
Copyright 2009, Vaculogic Division of PST All rights reserved
order & shipping info site map © 2017 PST privacy policy terms contact